Buy this product: https://www.ddzheng.cc/?page_id=666#buy-now
Table of Contents
- Disclaimer & F.A.Q.
- About This Project
- User Guide
- Open-source Hardware
- Buy Now
- Resources
- Production Record & Schedule
Disclaimer & F.A.Q.
- Experimental product. May not work for you. May not work at all.
- Special care required when using multiple. See Wi-Fi Power Off
- Shipping may be slow. Price may go up or down without prior notifications
- California P65
- I have no control over how page-ID is generated in WordPress
- Can I get a refund if the product does not work?
- If it’s due to a quality issue, you can have a refund. You can also ask for an exchange to get another unit for free.
- If it’s due to incompatibility with a host device not previously tested, you can have a refund.
- If you simply don’t like/want the product, you cannot have a refund.
- What’s the procedure for a refund?
- You should first contact us via email, See Contact
- You do not need to return the card. You need to destroy the card and send the evidence of destruction (image or video). We’ll then refund you.
- There are audio noise after I installed the card
- You need to disable the wireless. See Wi-Fi Power Off. You may need to recap your synthesizer if it’s old. If problem still persist, please contact us via email
- There are pops and clicks in the audio
- The data read from the card is corrupted. Ensure the upload completed successfully. Use Wireless off if not already done so. Try to clean the expansion connector with contact cleaner. You may need to recap your synthesizer if it’s old. If problem still persists, it’s likely an issue with the card itself.
- How does the firmware handle the image file?
- The firmware writes the image file to the flash chip as-is without any modification.
- The card is a little bit shifted compared to original card
- This is a known issue and should not interfere with installation. However, installing an original Roland card side-by-side with this product may be a little bit stiff.
- The standoffs are hard to align/rotate into place
- Roland devices from different eras use different quality standoffs. Some of those will be hard and brittle by now, do not force them.
- Is this card compatible with Sector101 SR-JV Romulator Extension?
- No, due to flash speed is slow, you cannot add extension cable.
About This Project
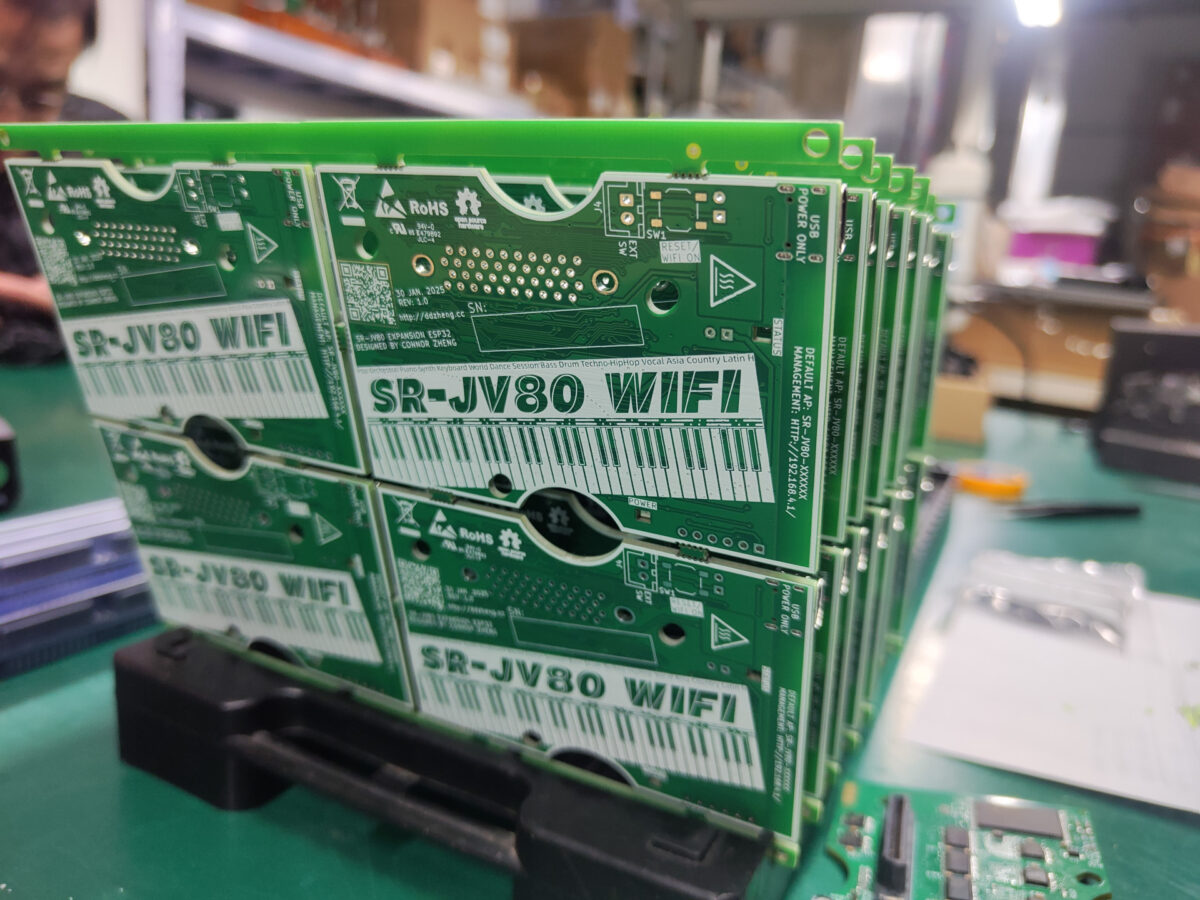
This board is a re-writable ROM card with a Wi-Fi based user interface. It can store a ROM image up to 8MB/64Mbit, usually custom authored, and be used in compatible Roland synthesizers in place of an original SR-JV80 series expansion card to research the sound generation and synthesizing.

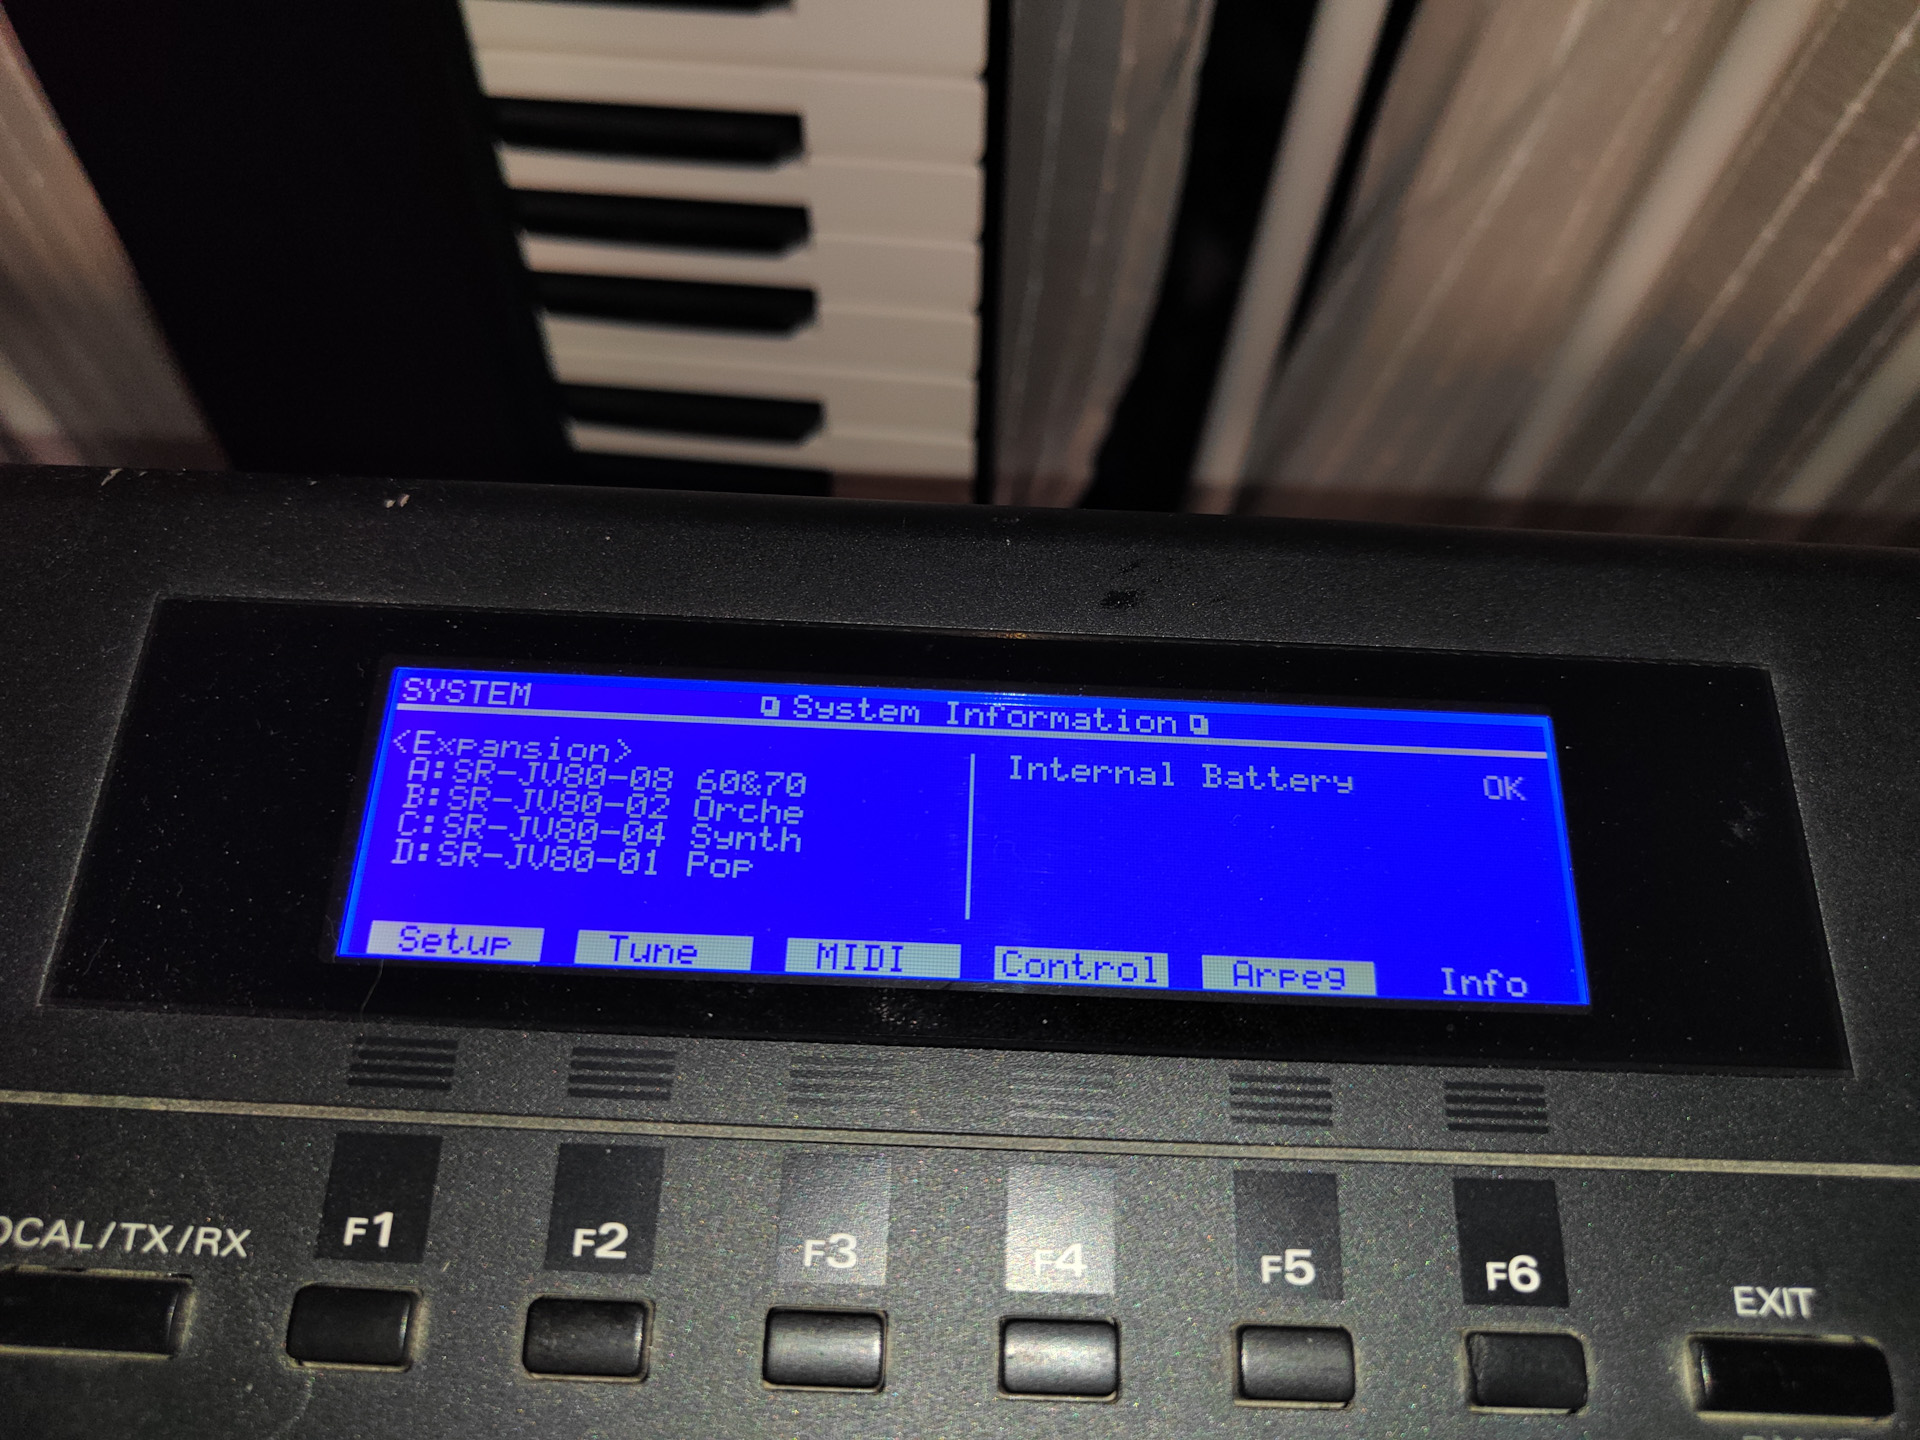
Compatible Hosts
This card is designed to be compatible with all Roland synthesizer which have slot for SR-JV80 series expansion cards. However, not all hosts are tested. See Known Issues for details and workarounds, modifications. Now in stock are HW Rev 1.2, older revisions listed for reference in case someone run into these. Green means the combination of hardware revision and host is tested to work, while orange means partial or complete incompatibility. Blank means it’s not tested but should work.
| Synthesizer | SR-JV80 Slots | Lot No. 1 (HW Rev 1.0) Compatibility | Compatibility for All New Cards After Lot No.1 (HW Rev 1.2) |
| JV-80 | 1 | YES Workaround or Modification Needed | YES |
| JV-880 | 1 | YES Workaround or Modification Needed | YES |
| JV-90 | 1 | YES | |
| JV-1000 | 1 | YES | |
| JV-1010 | 1 | YES | YES |
| JD-990 | 1 | YES Wireless off is required to remove interference | YES Wireless off is required to remove interference |
| FA-76 | 1 | YES Won’t work when using waveform from this card and internal/SRX in same patch at same time | |
| XP-30 | 2 | YES | |
| XV-88 | 2 | ||
| XP-50 | 4 | YES Won’t work in slot C & D | YES Won’t work in slot C & D |
| XP-60/80 | 4 | YES Won’t work in slot C & D | YES Won’t work in slot C & D |
| JV-1080 | 4 | YES | YES |
| XV-3080 | 4 | YES | YES |
| XV-5080 | 4 | YES | YES |
| JV-2080 | 8 | YES | YES |
Parts and Function
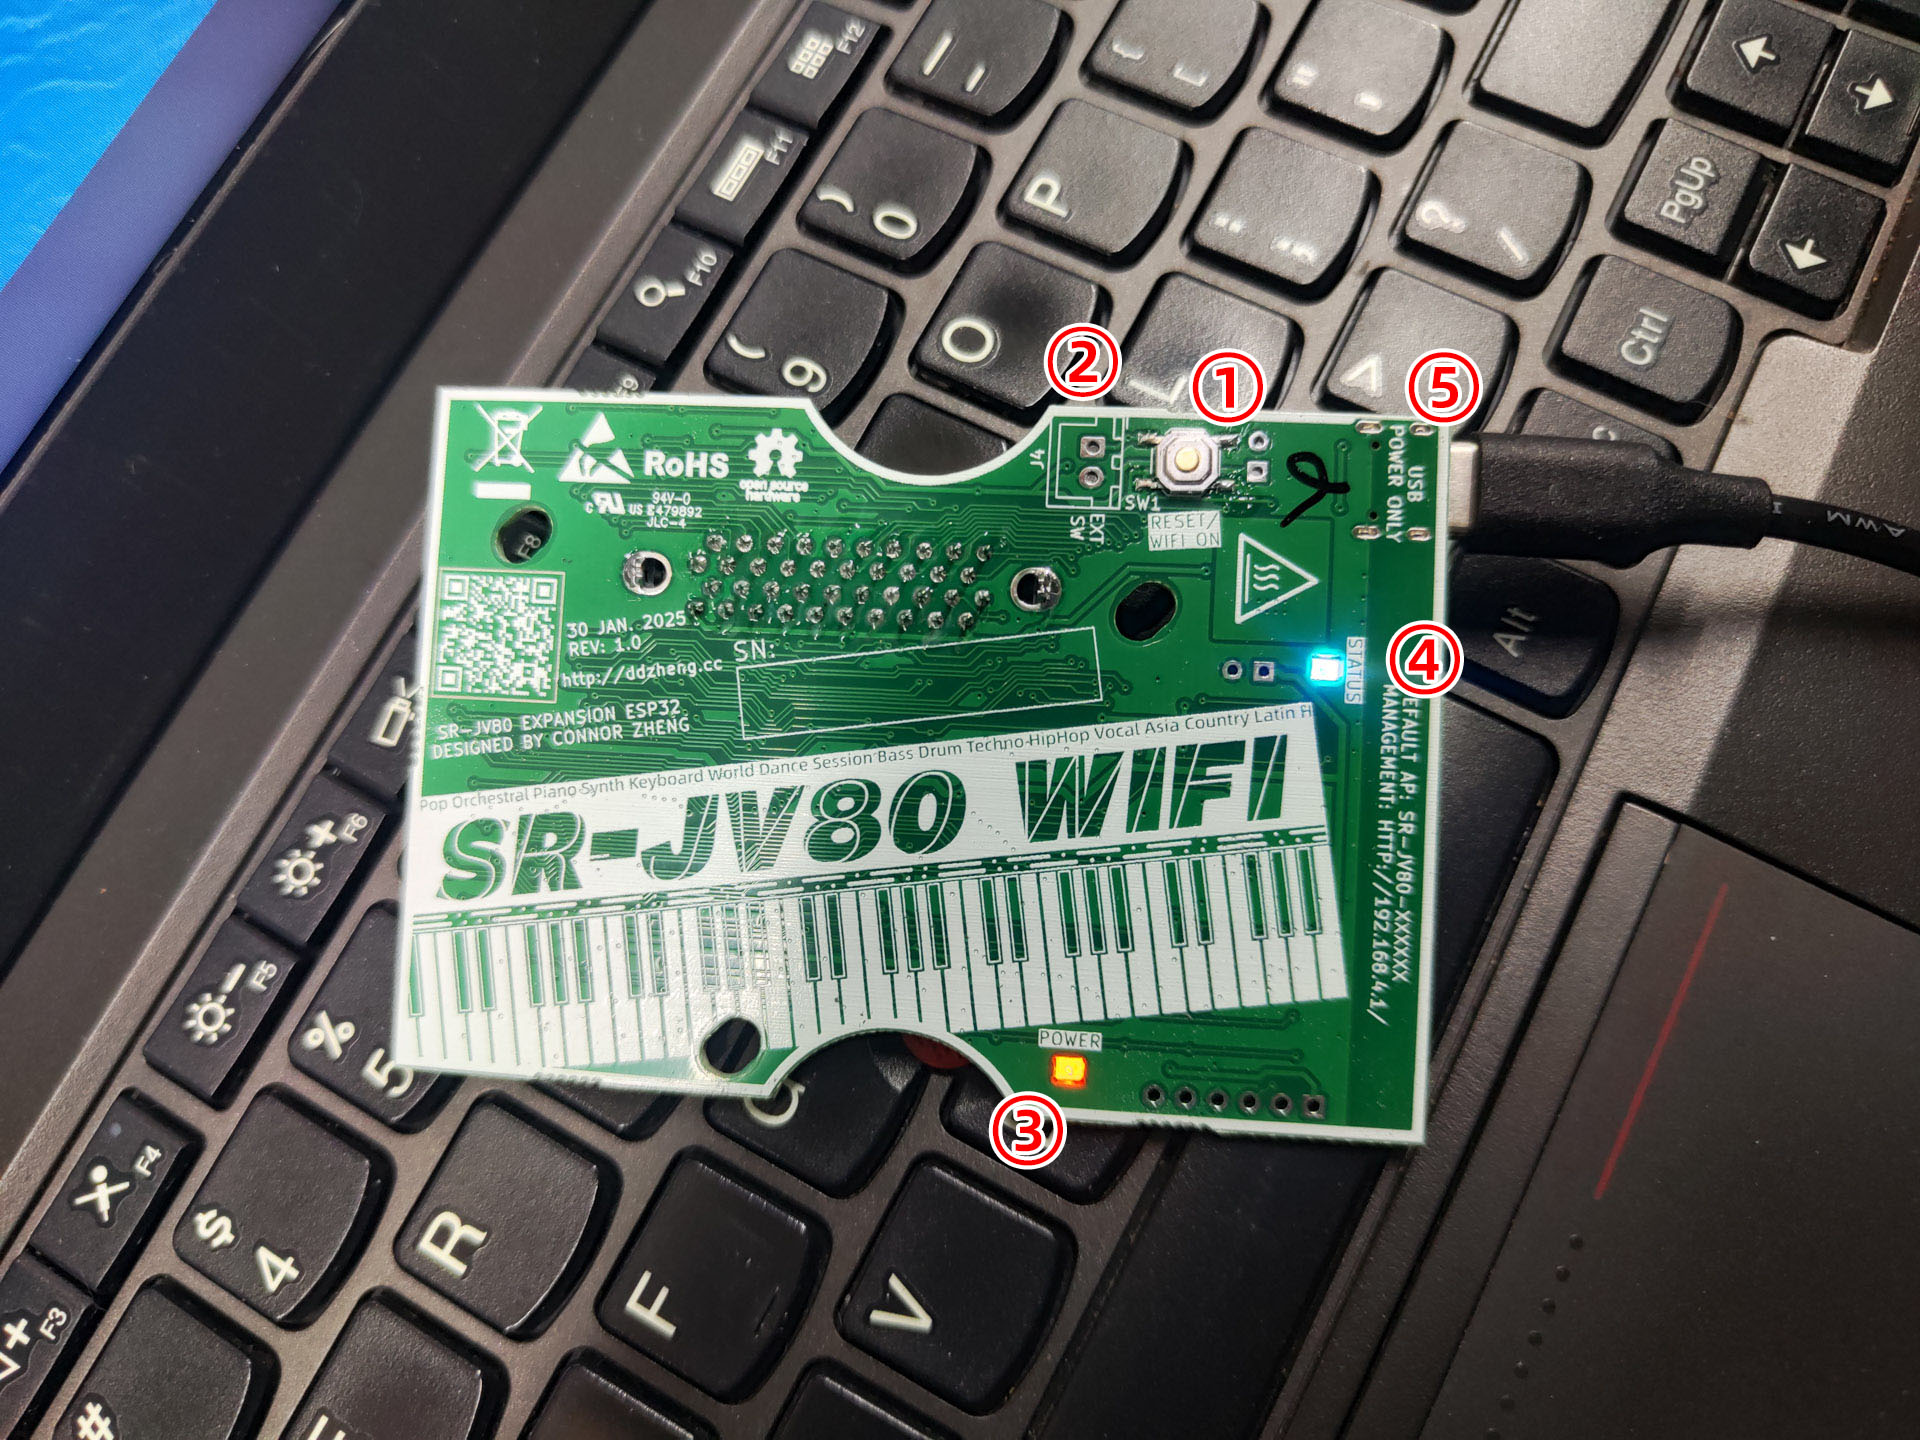
- Button – for activating Wi-Fi and resetting configuration
- Remote Button Header – user can solder a remotely mounted normally open button to this footprint. A button wired here has exactly same function as the onboard button
- Power Indicator – on when power is supplied to the board
- Status Indicator – blink slowly when Wi-Fi is on and no operation; on solid when operation in progress; blink rapidly when error; off when Wi-Fi is off
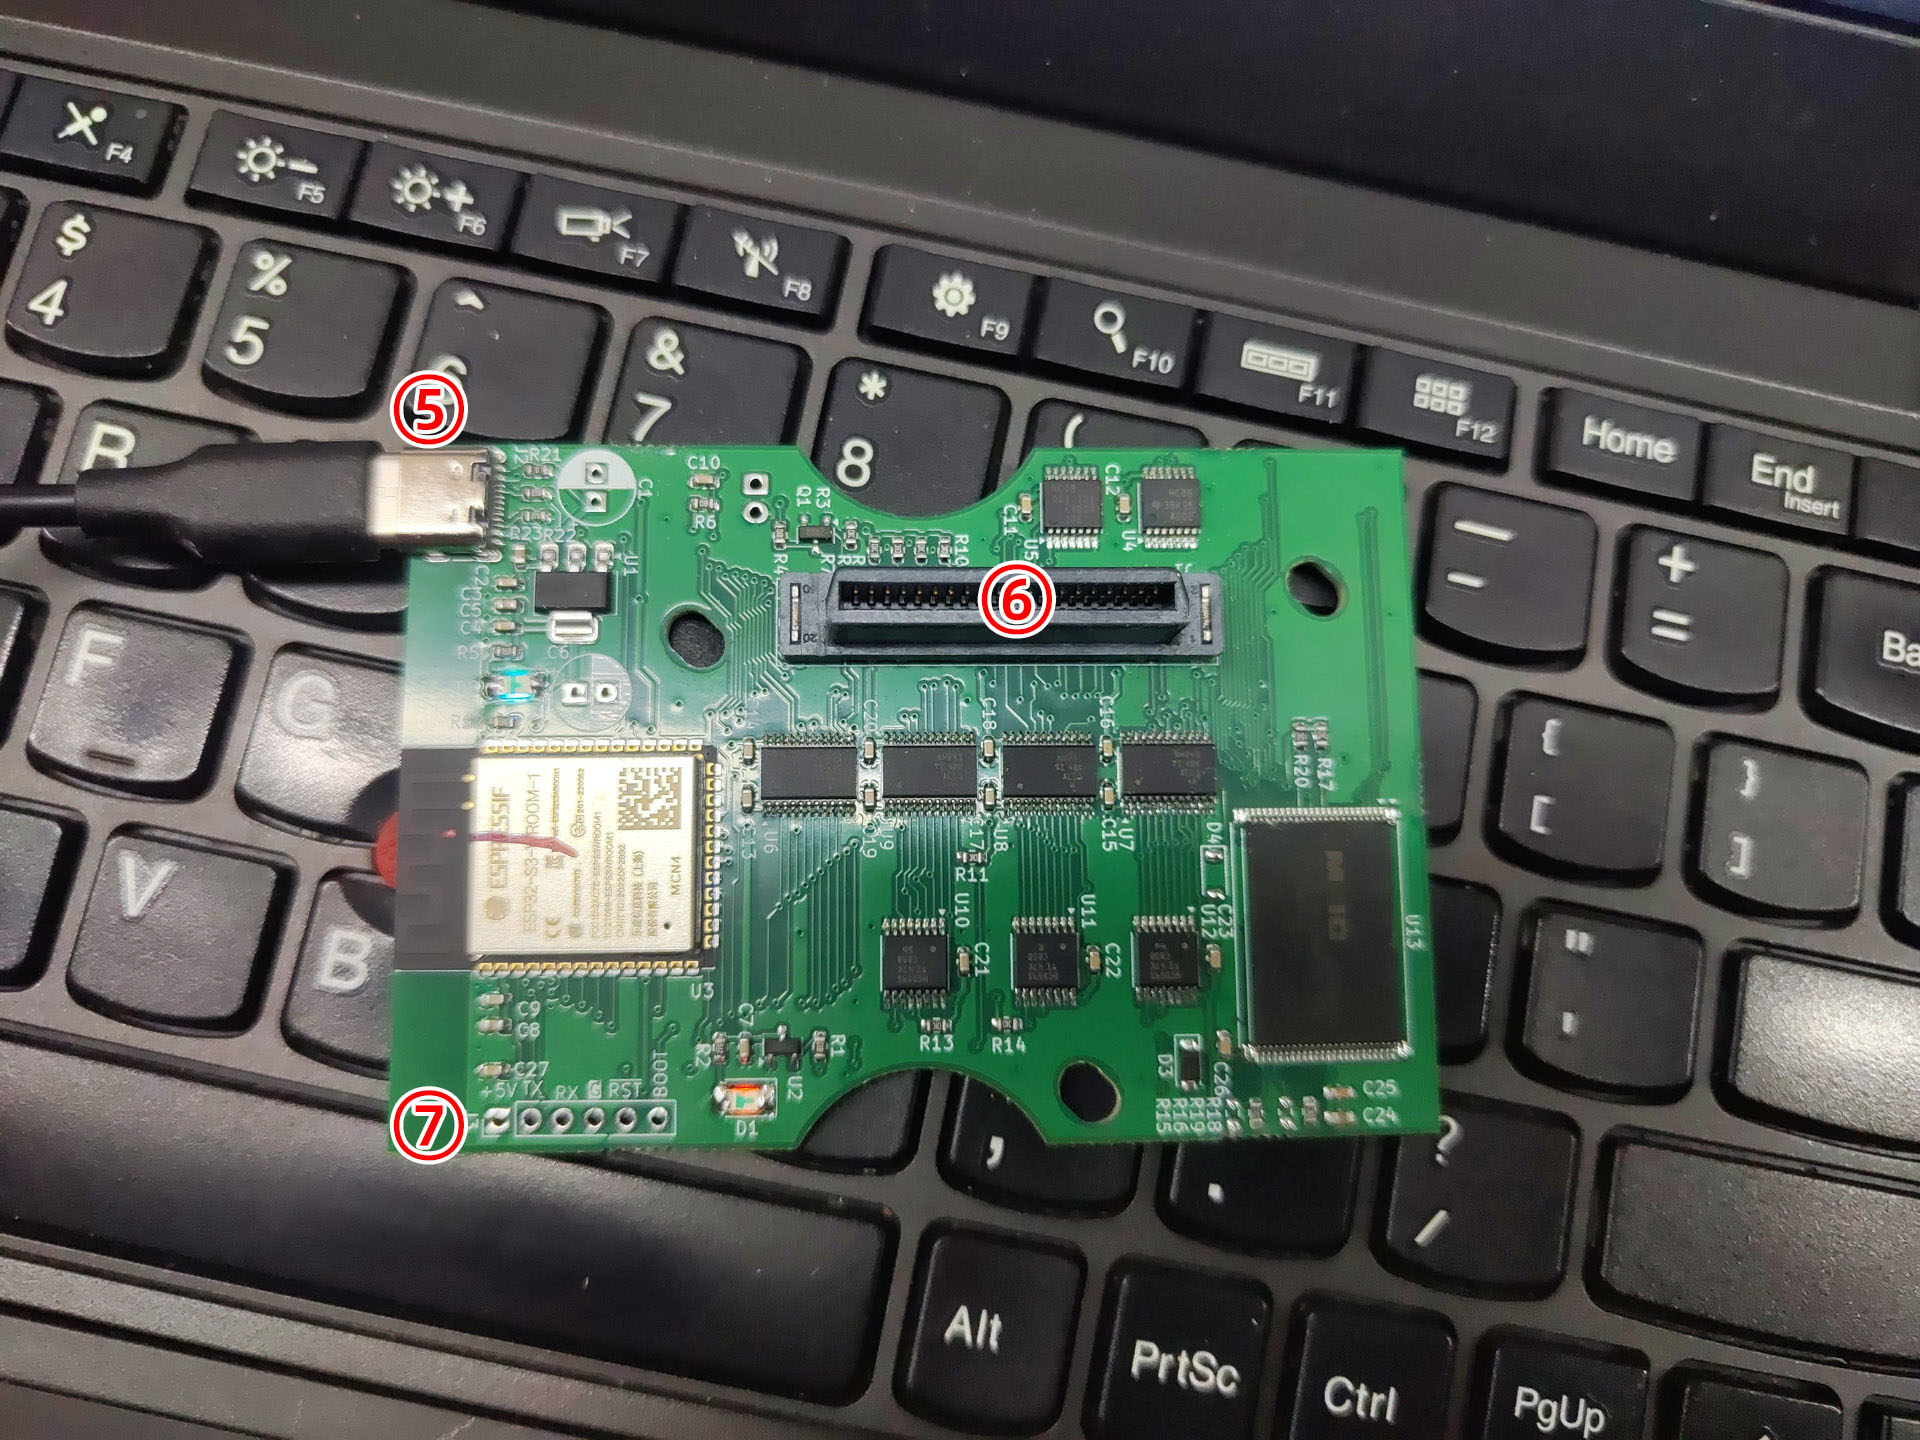
- USB connector – for powering the board when out of a synthesizer
- Expansion connector – for connecting to host synthesizer, the connector has been filed on some location to reduce stress
- Production header – for developer only, provides access to ESP32 UART, BOOT0 and RST. Can be used to program ESP32 in case the firmware is corrupted, or to develop own firmware
Board Info
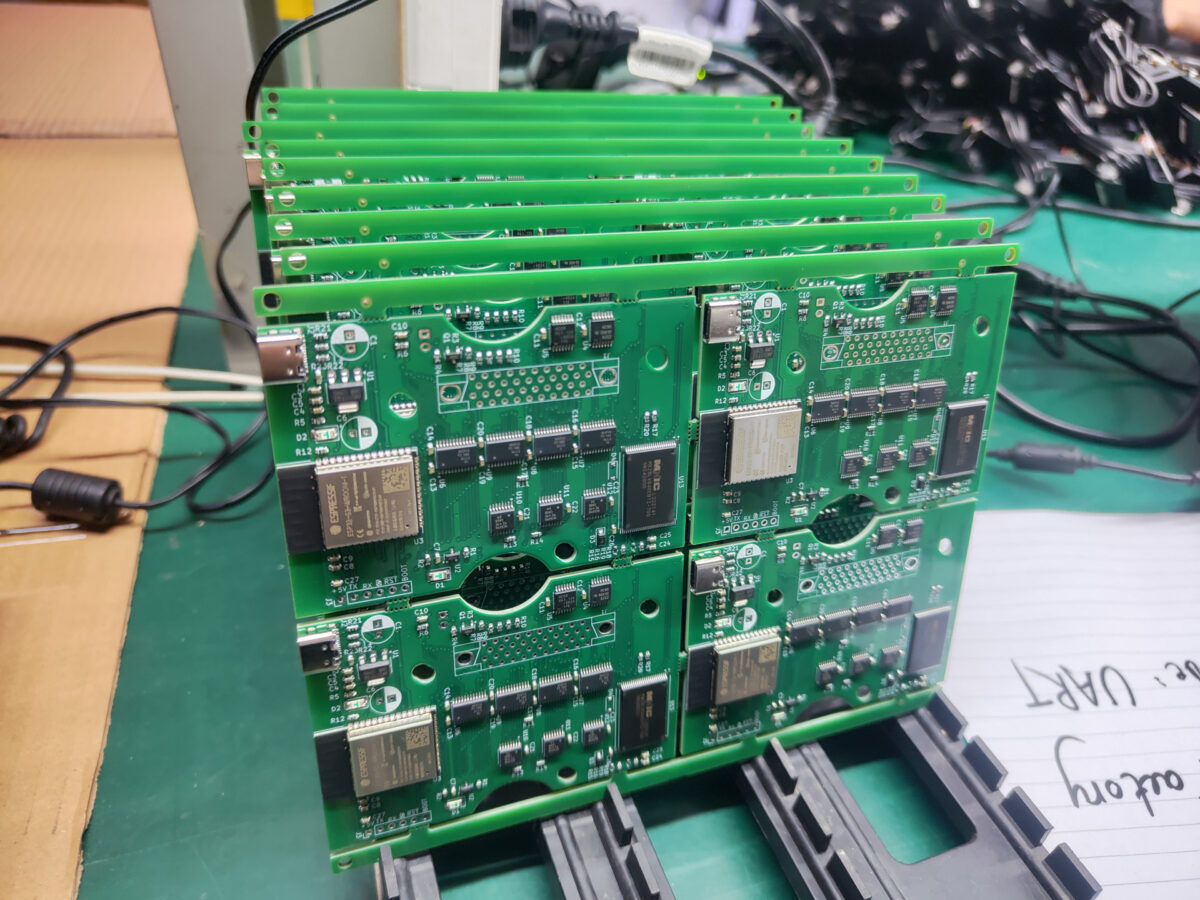
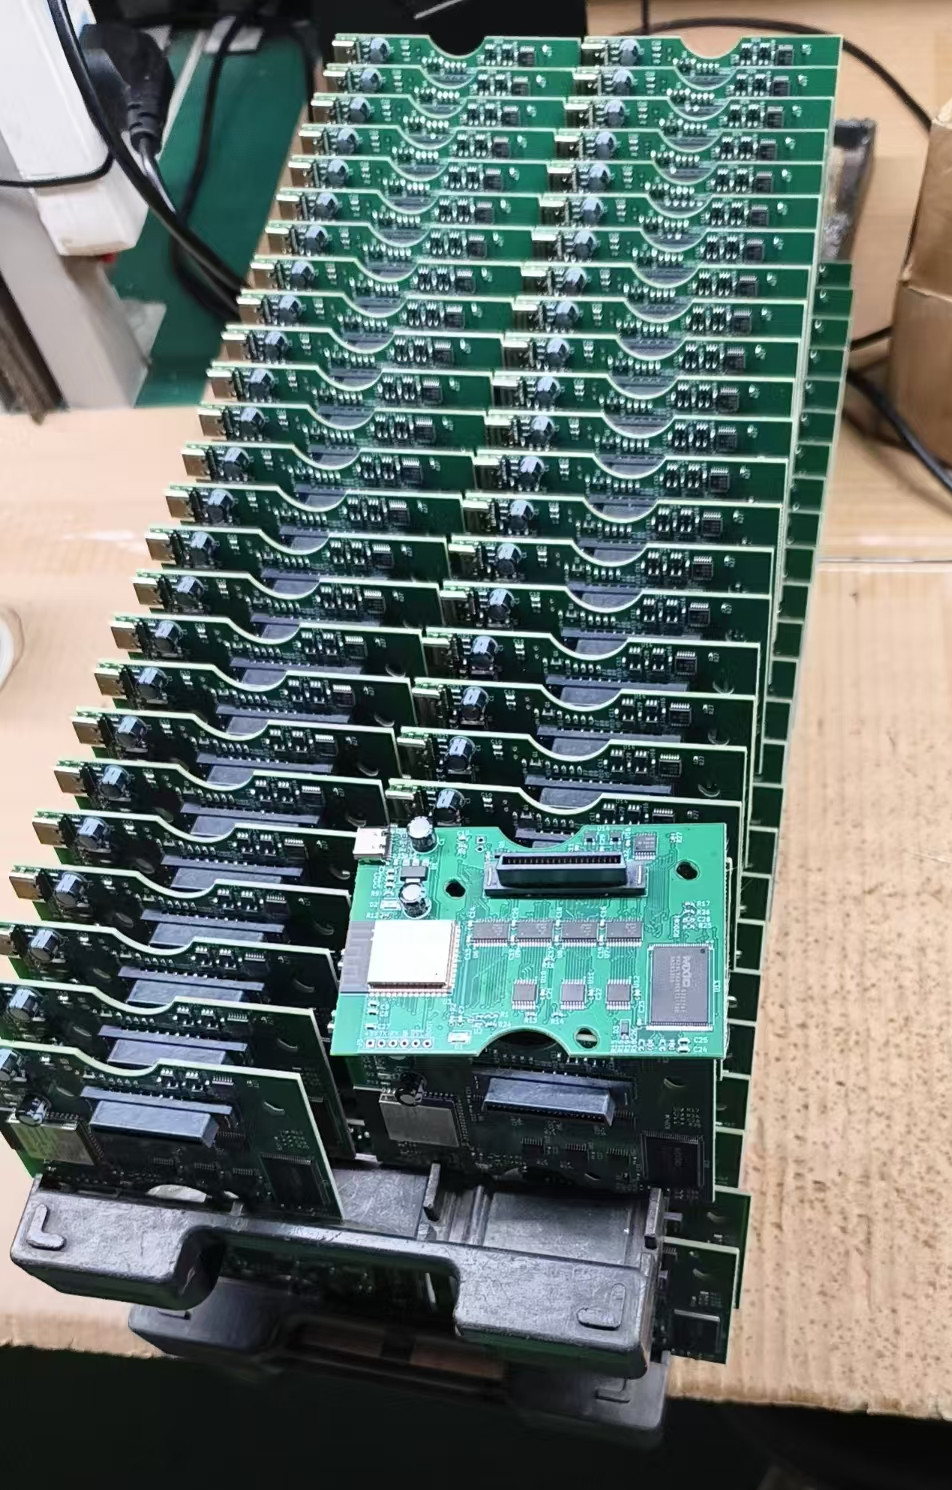
Designed by me, Connor Zheng, in Beijing, China. Assembled in Beijing, China with components sourced globally. PCB by JLCPCB. 4-layer FR4, Lead-less HASL, RoHS 1, UL 94V-0. All components RoHS. SAC solder.
Comparison with Sector101’s Romulator
This is not a clone of Sector101’s product. The Romulator is a more faithful reproduction of the original Roland cards, using nothing but 4x 2MB Flash on the card. Their programmer is standalone and not included on the card. This means electrically the Romulator card is exactly same as original card, which won’t have power consumption issues, wireless interference or signal integrity and delay issue, and is guaranteed to work in all hosts. You will have to take out a Romulator card from the synth to re-program it, or use their extension cable to place the card out side of the synth.
This product use 1x 8MB Flash and incorporates a ESP32 wireless microcontroller as on-board programmer. It is easier to use, can be programmed while inside synth, however have higher power consumption. The flash chip is connected to the host synthesizer through voltage shifting buffer IC, which has added delay, causing stability issue in some cases.
If you need a programmable card in any of the following situation, you mustn’t purchase this product and instead you will need to use the Romulator or original card:
- Usage in slot C or D in XP50, XP60, XP80
- Need to combine waveform from SR-JV and internal/SRX at the same time in one patch when using FA-76
- Usage in an incompatible synthesizer
- Require minimum power stress on synthesizer
- Require maximum reliability for critical application (e.g. on-stage performance)
Releases, Changelog and Known Issues
HW Rev 1.2
- Changed address encoding chip to 74AHC86/74LV86 to reduce propagation delay
- Changed CE line control circuit to 4x 74LVC1G125 to reduce propagation delay
HW Rev 1.1 – No production
- Changed reset circuit, flash reset is now isolated, should be fully compatible with JV-80 and JV-880.
HW Rev 1.0
- Initial Release. Modification or workaround is needed to work on JV-80 and JV-880. Does not work on XP-50/60/80 slot C and D due to delay
- Affected Lot Numbers: 1
- Affected Datecodes: 2506
- Workaround for Lot No. 1 board on JV-80:
- Press and hold NUMBER 1 button while powering on, or if this doesn’t work:
- Boot synth in test mode and exit test mode (Reference service notes)
- Workaround for Lot No. 1 board on JV-880:
- Press and hold EDIT and COMPARE button while powering on, or if this doesn’t work:
- Boot synth in test mode and exit test mode (Reference service notes)
- Modification for Lot No. 1 on JV-80/880: https://www.ddzheng.cc/?page_id=805
FW 1.11 Release
This version only added functions related to factory test. There is no need to upgrade from 1.10 to this version. Firmware package is not provided.
FW 1.10 Release
- Added AP channel selection function, changed default channel to 11
- Added AP hide SSID function
- Added show current value function for configuration dropdowns in HTML
Download FW 1.10: https://drive.google.com/drive/folders/1DnFtr_di28IOTllp2gWrjLeQtrrozbTT?usp=sharing (Upgrading to this version will erase all your current configuration and reset the ROM status. ROM content will not be affected.)
FW 1.00 Release
- Fixed an issue where Apple devices are not supported in Bluetooth LE wakeup.
- Fixed an issue in HTML
- Fixed an issue where Bluetooth LE advertisement is sent once on boot, even if wireless mode is set to All Off
FW 0.99 Release
- Bluetooth wakeup only supports Android phone.
- Affected Lot Numbers: 1
- Affected Datecodes: 2506
User Guide
Installation
Please follow the original Roland SR-JV80 series expansion card operator’s manual to install. Before installing make sure to unplug the mains power from the synthesizer. If you want to program/configure the card before installing, you can power the card by using a regular USB type-C cable and connect the other end to either a power supply or a computer.
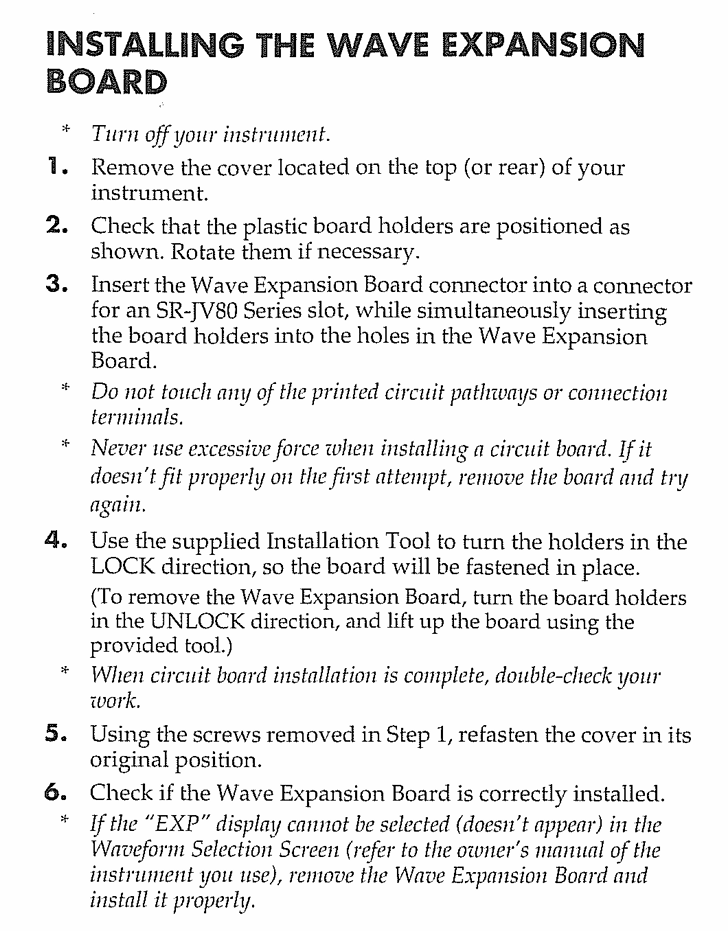
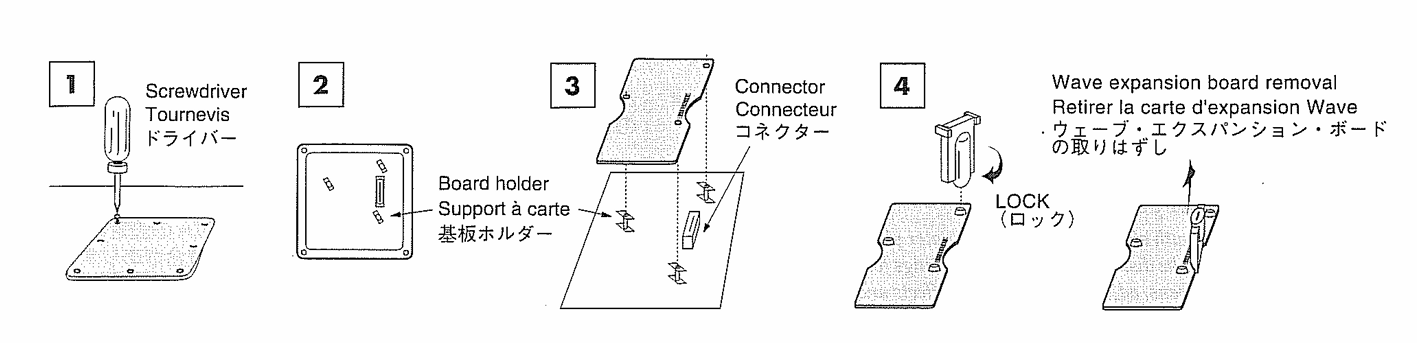
Note: It’s highly recommended to use anti-static wrist-band connected to a solid ground connection to avoid static discharge damage to either the card or your synthesizer.
Note: If the board holder is too tight to rotate into place, do not force it. Leave it as is.
Note: If using multiple expansion cards it’s strongly recommended to configure Wi-Fi off in the configuration page.
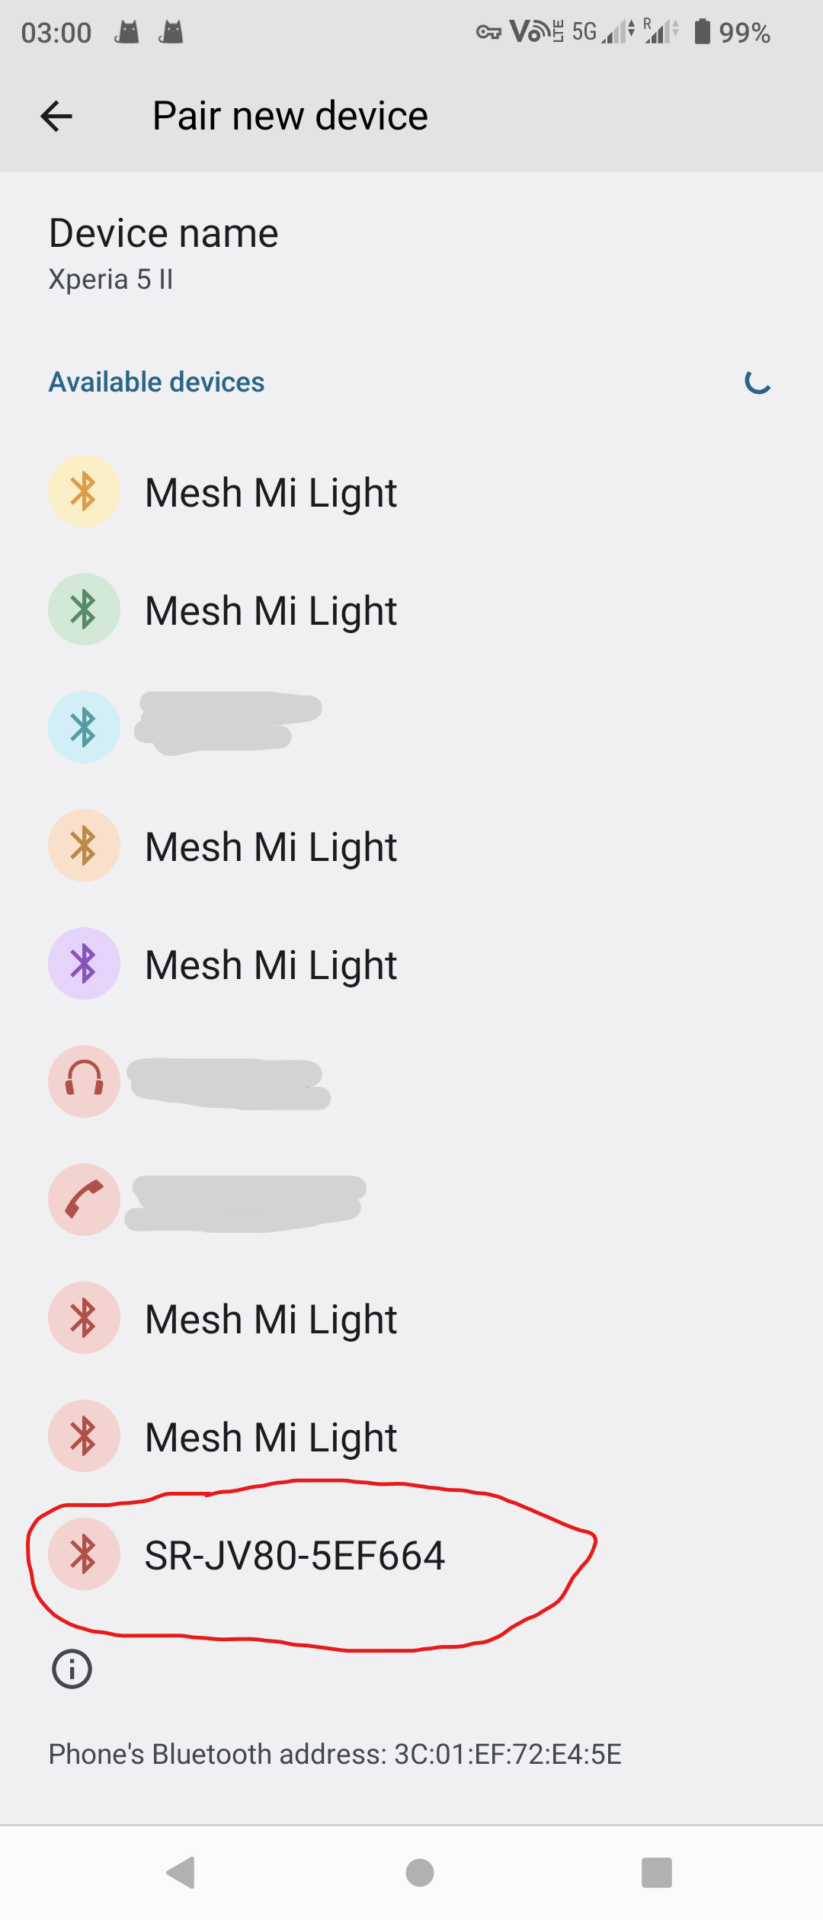
Connecting to the Card
When the card is powered up and not in Wi-Fi off state, you can connect to the card’s Wi-Fi hotspot. Default name is “SR-JV-XXXXXX” where XXXXXX is the last 3 octets of the Wi-Fi interface’s MAC address and no password:

Once connected, open a new browser tab and navigate to “http://192.168.4.1“:
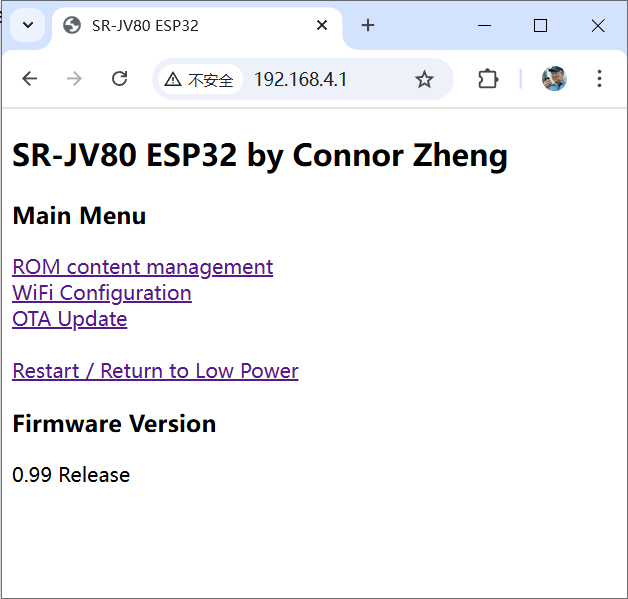
Click on any one of the link to go to their corresponding section.
ROM Content Management
Note: Change the synthesizer’s current selected patch/perform/rhythm to not include anything from the card before manipulating flash ROM. Otherwise the synth may crash and/or the synth patch data may get corrupted.
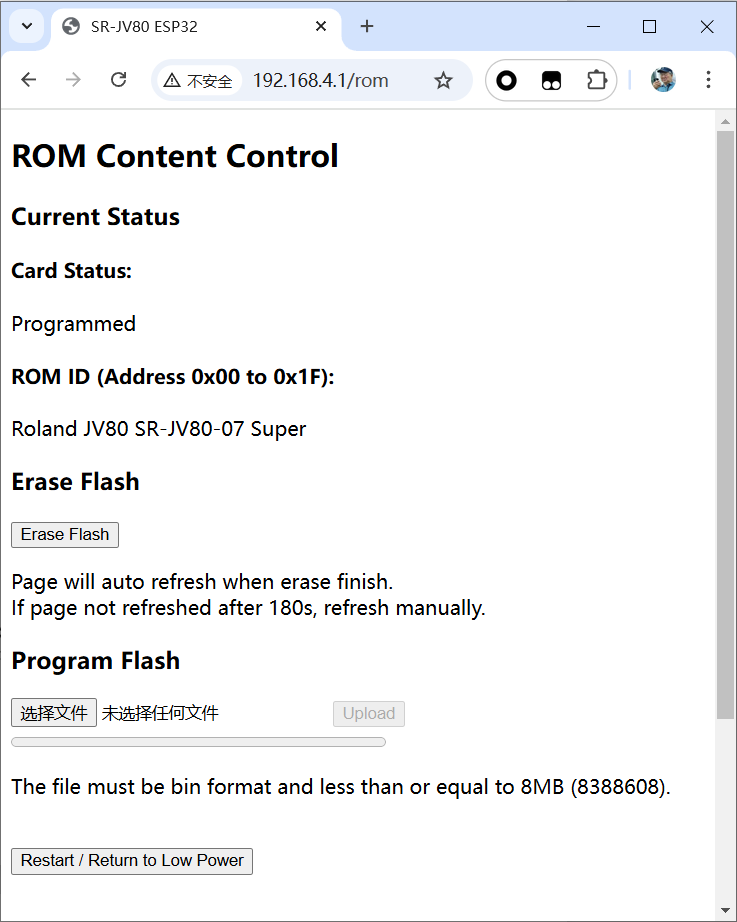
The status indicate whether the flash ROM is erased or programmed. Possible states are: ERASED, ERASING, PROGRAMMED, PROGRAMMING and UNKNOWN.
Before programming, the flash need to first be erased. Click “Erase Flash” to erase flash, this will take about 1 minute:
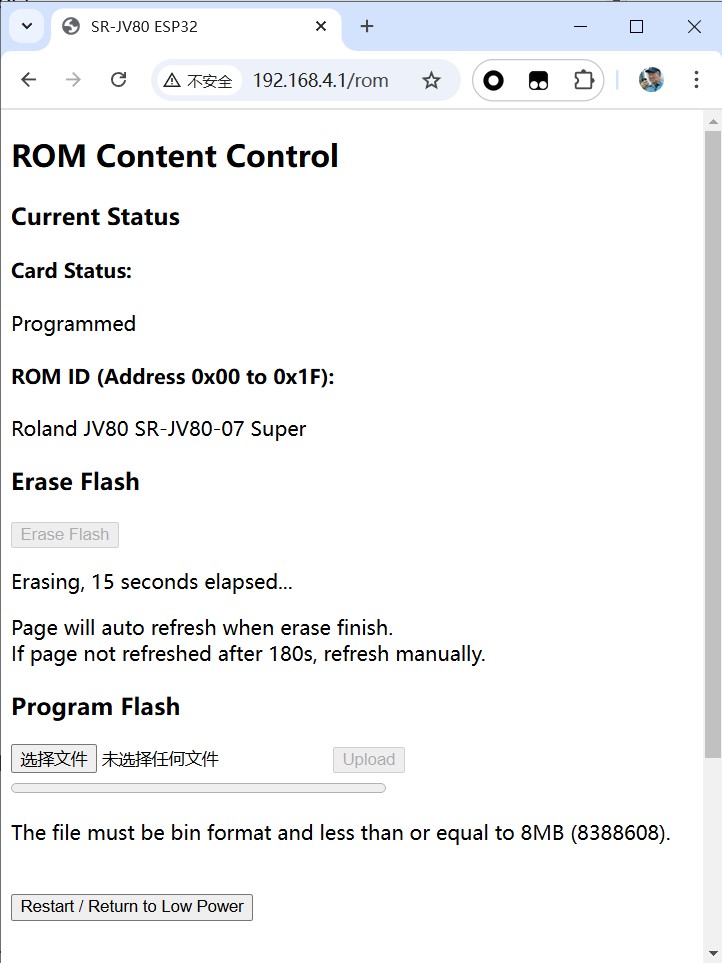

After the erase is finished, the page will automatically refresh.
Then you can program the flash with a image file. Browse for a BIN file and hit upload to write the flash, a full 8MB image will take 6 minutes to write:
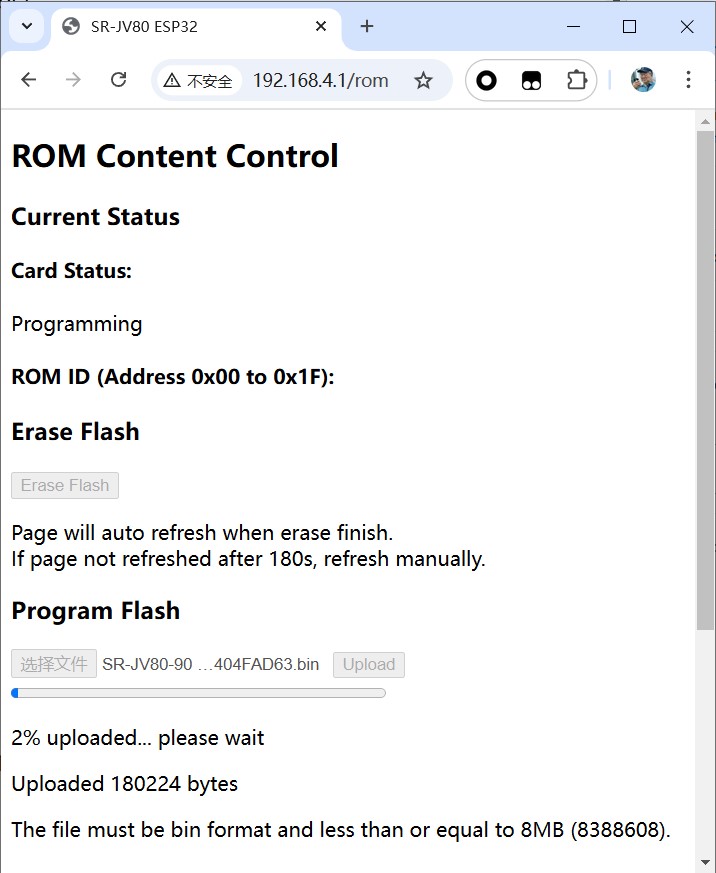

Do not close the browser tab or disconnect Wi-Fi when writing. If “Upload failed” is displayed, it’s due to Wi-Fi interruptions or browser issues and is not related to the card’s hardware. Please plug in power if using laptop, disable screensaver and auto screen off, disable power saving function of browser, and stay in the tab while the upload is in progress.
Note: After writing is finished you need to power cycle your synthesizer to use the new ROM.
If the erasing or programming operation has been interrupted or failed before finish, a power cycle will recover the status to UNKNOWN and you can try program the same file again without erasing. In the state UNKNOWN you can either erase or write the flash. But if the flash is partially programmed and you try to program another file, the content will become corrupted and need to be erased.
Configuration
Wi-Fi Credentials Configuration
You can change the Wi-Fi hotspot name (SSID) and optionally set a password.
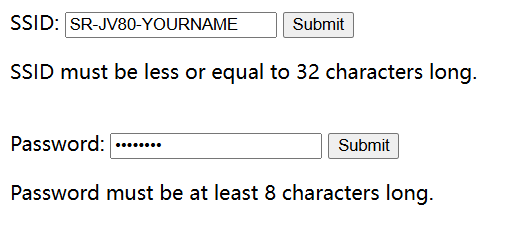
Note: SSID cannot include space (” “) and cannot be longer than 32 characters; Password cannot be shorter than 8 characters or longer than 32 characters.
Once you have decided on the SSID name or password, click submit to confirm it. A restart is needed for configuration to take effect.
Note: You’ll have to wake the card again after using “Restart” if Wi-Fi power off is configured. If you experience difficulty connecting with password changed, after you hit “submit”, instead of using the restart button, try do a power cycle. Depending on the operating system and wireless network card used, you may also have to “forget network” before connecting to it again, especially if the SSID name is not changed.
Wi-Fi Power Off Configuration
Installing more than one card without using one of the low power modes may cause your synthesizer’s 5V power supply to overheat, go into overcurrent protection, and/or be damaged. If you don’t need to change the content or if you have access to the button switch, just use Wireless Off mode. There’s no guarantee that these low power modes will solve all issues. I’ll not be held responsible if your synth burns up.
Normally this card would consume about 150mA with Wi-Fi on, and when actively writing the current will be 200mA or more. When multiple cards are installed this will likely cause the synthesizer’s power supply to go into overcurrent protection. In such case, you can configure Wi-Fi off to minimize current consumption. If you experience RF interference, you can also use this function to eliminate it.
There are 3 options: Always on, Wi-Fi off with BLE wakeup, Wireless all off.
- Always on: Highest power consumption. The Wi-Fi interface is always on, suitable when no interference and only 1 card is installed
- Wi-Fi off with BLE wakeup: Medium power consumption. Wi-Fi will be off upon boot. Wi-Fi can be activated by button or Bluetooth. This is suitable for a closed chassis situation without a remote mounted button. Current consumption is about 80 mA when Bluetooth is advertising with an average of 30 mA.
- Wireless all off: Lowest power consumption. Wi-Fi and BLE are off. Wi-Fi can be activated by button only. RF systems are shut down.
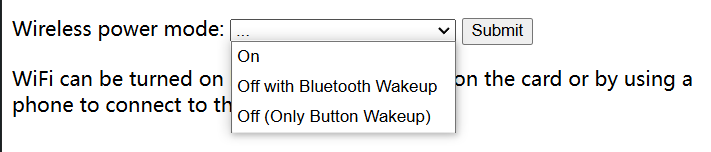
Once you have selected an option, click submit to confirm it. A restart is needed for configuration to take effect.
Also, after manipulating the flash ROM on one card, remember to return to low power mode by using the link in the webpage or power cycle, before moving on to wake next card.
Waking Up the Card/Activate Wi-Fi
In both Wi-Fi off modes, you can press the button to activate Wi-Fi, either the onboard one or a user-soldered remote mounted button switch. Press the button for about half a second until the status LED starts to blink slowly. When waking up from sleep, holding the button down won’t clear the config.
If using BLE wakeup, you can use a smartphone, tablet or computer to wake the card’s Wi-Fi by initiate a pairing attempt with the card. Navigate to the Bluetooth settings of your phone, and select the option for pairing a new device. The device name is same as the Wi-Fi SSID configured. Click on the device name to initiate a pairing. You may need to click more than once for it to work. The pairing attempt will fail, and Wi-Fi will be activated.
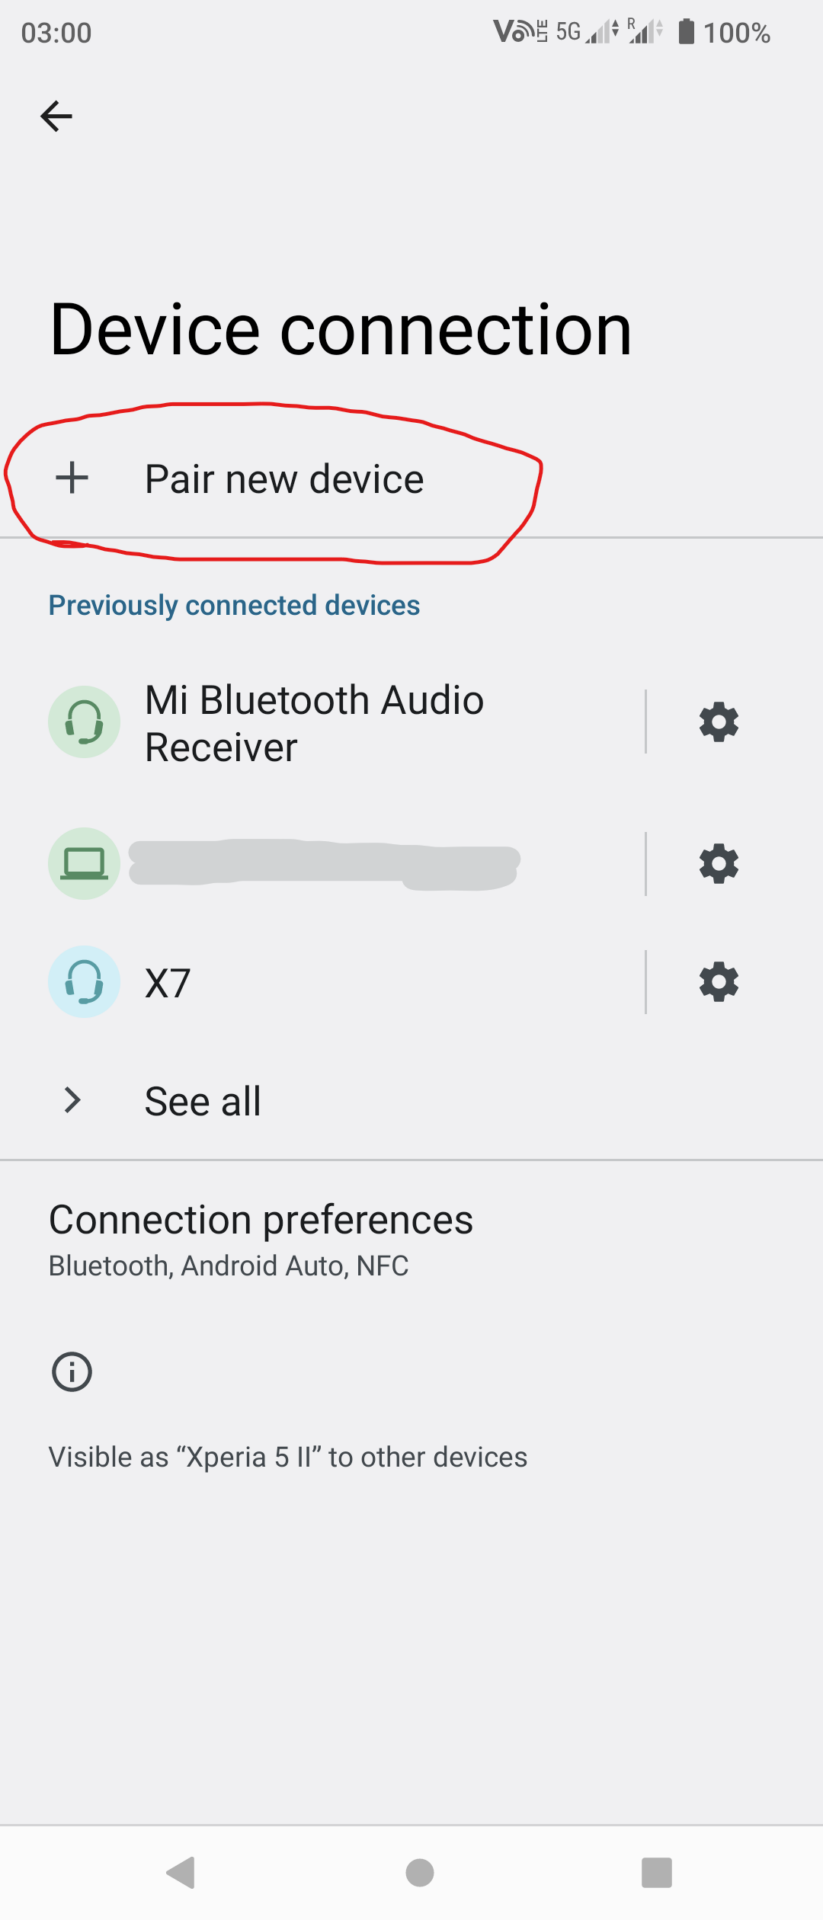

Note: It’s by design that the Bluetooth pairing attempt will fail. This eliminates the need for an app, and you won’t need to un-pair the device before next Bluetooth wakeup.
Apple device users: Please update to FW Ver 1.00 or later to use Bluetooth wakeup on iOS devices.
[FW 1.10+] Wi-Fi Channel Setting
It’s now possible to select a channel for the Wi-Fi AP. Recommended channel is either 1, 6 or 11. Default channel is 1 in FW versions before 1.10 and 11 in FW version 1.10 and later.

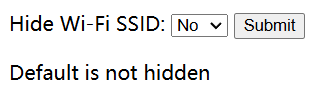
[FW 1.10+] Wi-Fi Hidden SSID Setting
It’s now possible to hide the Wi-Fi AP. You can still connect to it if the SSID and password (if any) is known, but it won’t show up on Wi-Fi scans if it’s not been previously connected. Please make note of SSID if you are changing that at the same time.
OTA Firmware Upgrade
If you are updating using a pre-compiled BIN file, skip this step. If you are compiling from source, select “Export Compiled Binaries” in Arduino IDE:

If you got a firmware ZIP file, decompress it.
Select sketch BIN file and update:

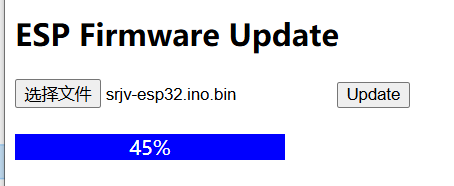
After the progress reach 100%, the card will reboot to the new firmware and the page will redirect to homepage after 5 seconds. If Wi-Fi power off is configured, the redirect will fail. You need to wake the card again. Please disconnect Wi-Fi and reconnect to the card in such case. If you cannot connect to Wi-Fi after an OTA update, a power cycle will restore things to normal.
Note: Updating to certain versions will cause the configurations to be erased. This will not affect ROM content.
Note: If the BIN file is corrupted or wrong, the update will be rejected and error (fast blinking) will be shown on STATUS indicator. If the ESP32 cannot boot the new firmware, it will revert back to the working firmware. In rare case that the board cannot boot, it can be flashed normally by using the production headers and USB to TTL adapter. The ESP32 has an internal bootrom so it is not possible to actually brick it. Follow guides on developing ESP32 to know more.
Resetting Config
If you forget the password or otherwise need to reset the configuration, please follow these procedure:
- Power off the synthesizer or unplug USB power, wait at least 10 seconds
- Press and hold the button down
- While holding the button down, turn on the synthesizer or plug in USB, the STATUS LED will blink rapidly
- Continue to hold button down, after about 3 seconds STATUS will light up solid
- Release button, card will automatically reboot, config is cleared
If you let go of the button too early, the card will return to normal working mode and configurations will not be cleared. Resetting the configuration will not erase the flash ROM, but the ROM status will become UNKNOWN.
Open-source Hardware
Hardware Repo:
https://github.com/connorzheng97/srjv
Firmware Repo:
https://github.com/connorzheng97/srjv-fw
Buy Now
9th batch is in stock. Please note I’ll be on vacation during Jun. 24 to Jul.2 and you may experience delay in order confirmation and/or outbound shipment. If you have any inquiry please contact us via e-mail.
1 Unit – USD 68.00, USD 6.00 Base shipping cost and VAT now included (see shipping for detail):
Providing a phone number is REQUIRED for destination: Angola, Bahrain, Brazil, Bulgaria, Canada, Croatia, Ghana, Greek, Israel, Jordan, Kenya, Kuwait, Malaysia, Mexico, Nigeria, Pakistan, Peru, Philippines, Qatar, Romania, Rwanda, Saudi Arabia, Singapore, Sweden, Tanzania, Thailand, Turkey, Uganda, United Arab Emirates, Vietnam (and any other destination that requires it, should this happen I’ll email you to ask for your phone number) and optional for other destinations. The phone number input is a “customization option” of the PayPal button and the value is not disclosed to any third party except for the express company. By submitting an order you agree to the terms listed in this section.
View cart and checkout:
Please note I cannot ship device pre-programmed with any image.
Payment and Shipping
Payment is processed by PayPal. PayPal offers a secure payment process whilst keeping your payment details private. PayPal WILL NOT disclose your Card Payment Information to me. Details such as Card Number, Expiry Date, and CVV number will only be known to PayPal. PayPal WILL send information such as your PayPal Email Address and the Shipping Address you have registered to your PayPal account. It is up to you to keep this information up-to-date as this is the email contact and shipping address we will use to contact you and where to ship your purchase. It is strongly advised that you email us with your current Contact Email and Shipping Address after you make a purchase to confirm these details.
I will combine and ship as many items as possible in one package if you purchase more than 1 item, as long as multiple items can be fitted in one package. Please pay first, I will refund you the shipping cost once I have handled the package (Due to VAT and the new tariff regulation of EU (EUR 3 per item), all orders bound for EU countries will not have shipping refund, regardless of number of units in the order).
We can ship to almost all countries except for warzones and conflict regions. If your destination is not listed, it means I don’t have a contract for your destination with my primary express service but I have other service providers that I can use. please contact me first.
United Arab Emirates, Angola, Austria, Australia, Belgium, Bulgaria, Bahrain, Brazil, Canada, Switzerland, Cyprus, Czech Republic, Germany, Denmark, Estonia, Spain, Finland, France, Ghana, Greek, Croatia, Hungary, Ireland, Israel, Italy, Jordan, Japan, Kuwait, United Kingdom, Korea, Kenya, Lithuania, Latvia, Malta, Mexico, Malaysia, Nigeria, Netherland, Norway, Peru, Philippines, Pakistan, Poland, New Zealand, Portugal, Qatar, Romania, Serbia, Russia, Rwanda, Sweden, Singapore, Slovenia, Slovakia, Thailand, Turkey, Tanzania, Uganda, United States, Saudi Arabia, Vietnam, South Africa
All shipment originate from China, are handled by Yuntu Express and are by air. Shipping usually takes 3 to 10 days depending on where you are.
Return and Refund
If you need a refund before the package has been picked up by express service, send email with detail of your purchase. Shipping cost is non-refundable.
If you receive a faulty unit, you are eligible for refund or exchange of a new unit. Please contact using email so that we can work something out. By submitting a order you confirm that you are aware of: a return and refund may not be possible depending on the location.
Turnaround Time
- An email will be sent to you to confirm your order, once you have paid the bill. Please allow up to 24 hours for me to respond and confirm your order by email.
- An email will be sent to you with shipment tracking number and method of tracking. Handling time is usually 3 to 7 days before I can email you with a shipment tracking number. Sorry for any inconvenience as I don’t work full time on this.
- Tracking info will also be updated in PayPal
As Yuntu Express does not have a collection service in my city, I gather packages and send them as bulk package to the service. I send out bulk packages at least twice may be 3 times per week.
Purchasing-related Contact
For purchase related issue and/or to confirm your address/email, please mail to: [email protected]. In case of urgent matter, an email may be sent to contact you from either my personal email listed in the about page, or from an @sa1tech.com email address. All of these described email addresses are legit.
We may use old stock of packaging material from other products. You may receive material with “Yanyu” or “StrictFish” marking/packaging. You may receive material sent by SA1 Technology Co., Ltd.. “Yanyu”, “StrictFish” are trademarks of SA1 Technology Co., Ltd.. SA1 Technology Co., Ltd. is an affiliated company. All packages are packed under video/still image recording and weighted before shipment. Any scam activity will be recorded and reported to law enforcement agency local to the buyer.
Resources
- Image library, can be used to study the SR-JV sample / patch data format: https://drive.google.com/drive/folders/1de3TqrR-FJ5FtymICBgGj5p4qxhLRtZC?usp=sharing
- SRJV Authoring Tool by PythonBlue: https://github.com/PythonBlue/SRJV
- Chab’s fork of SRJV Authoring Tool: https://github.com/chab/SRJV
- The ultimate Roland JV, JD, XV F.A.Q. https://www.donsolaris.com/?p=404
- Roland Wave Expansion Cards https://www.dtech.lv/techarticles_roland_exp.html
- All SR-JV80 Card Patches SysEx for Auditing (on JD990) https://gearspace.com/board/electronic-music-instruments-and-electronic-music-production/1156668-cult-roland-jd-990-a-24.html#post16521659
- A product that has similar function, Sector101’s ROMulator: https://sector101.co.uk/sr-jv-romulator.html
- Gearspace thread: https://gearspace.com/board/electronic-music-instruments-and-electronic-music-production/1442130-diy-re-writable-roland-sr-jv80-card-wifi.html
Production Record & Schedule
To identify your board, scan the QR code printed on the board. Under “Unit Identification Number” you can find a 3-section code (example: “SRJV-2506-0001”). The middle section is the datecode in YYWW format. If a board have a large white block instead of a QR code, this info will be written on the board or on a sticker.
| Lot No. | Date Code (YYWW) | HW Rev. | Factory FW | Batch Size (pcs) | Date Available / Date Expected | Status |
| 1 | 2506 | 1.0 | 0.99 | 40 | Feb. 13, 2025 | Sold out |
| 2 | 2509 | 1.2 | 1.10 | 100 | Mar. 13, 2025 | Sold out |
| 3 | 2511 | 1.2 | 1.10 | 100 | Apr. 6, 2025 | Sold out |
| 4 | 2514 | 1.2 | 1.11 | 100 | May. 7, 2025 | Sold out |
| 5 | 2519 | 1.2 | 1.11 | 100 | Jun. 13, 2025 | Sold out |
| 6 | 2541 | 1.2 | 1.11 | 100 | Oct. 30, 2025 | Sold out |
| 7 | 2549 | 1.2 | 1.11 | 100 | Dec. 18, 2025 | Sold out |
| 8 | 2611 | 1.2 | 1.11 | 100 | Apr. 10, 2026 | Sold out |
| 9 | 2622 | 1.2 | 1.11 | 100 | Jun. 16, 2026 | In Stock |
This document should not to be re-distributed as archive since it is subject to frequent change. This document is Licensed under CC-BY-NC-SA.
Would it be possible to take this further and develop “Master” and “Slave” cards?
The Master would have the WiFi plus a header for connecting the Slaves (up to 7 on the JV-2080). Assuming serial communication is used, the Slave cards would have in and out headers for connecting in daisy-chain fashion. You select the “active” card in the web interface and the master card directs all operations to that card only.
Since the slaves don’t have WiFi, they would be cheaper to produce and having only one WiFi card would also solve the power problem.
You could then offer three different cards plus some kit options, for example:
W = Current standalone WiFi card
M = Master (WiFi card with slave header)
S = Slave (No WiFi with slave in/out headers for daisy chaining)
M1S = Master + 1 Slave
M3S = Master + 3 Slaves (JV-1080)
M7S = Master + 7 Slaves (JV-2080)
I would definitely be interested in this as I have multiple JV-2080’s – I think fitting 8 WiFi cards to a single unit is a bit silly.
Thank you for your interest and support. I’ve actually considered this plan in the past. However there are several reasons that prevented me from making such products.
First of all, one more SKU means a lot more logistics issues. There will be separate PCBs that need to made separately, BOM that need to be sourced and also production and testing will need to be updated. Second is the design effort. Both the boards and interconnects need to be designed. You are right about the serial connection, it’s what is used in the card now, but the signal integrity issue will be apparent on longer chains, as I’m running 80MHz serial clock which would be hard to keep up with in a multiple drop interconnect. And finally from product point of view, most of us do not change the content very often.
I hope this answers some questions. I’m currently unable to design any new products for vintage synthesizers. If you’d like, the Github page will be a good starting point for modifying the design into something of your own.
Quando teremos SRX?
No plan for SRX at the moment. Thank you for your comment.
This is such a great bit of kit, so easy to fit and use and opens up so many possibilities for the JV1080 – and a bargain too! Would recommend.
Thank you for your comment.
It looks like the current batch is sold out. When will the board be available again?
Today it’s back in stock!
Great idea. Fantastic concept. Amazing product!
I got two cards and they are both working flawlessly.
I will buy more in the future.
Thank You!
The “wonder card”😉 arrived here in Germany yesterday. I immediately installed it in my XP-80 and flashed the “Vintage Synth” firmware. Even during the upload, the display kept flickering and there was crackling in the synthesizer’s output. I hope to solve the problem by replacing the power supply capacitors, because even with Wi-Fi off, the issue persists. It’s really awesome! Such an old keyboard and after so many years finally really cool sounds thanks to the card! Thank you so much!
Sorry the card did not work out. For XP-80 please try to clean/re-seat the ribbon cable that connect main board to expansion board. Also replacing capacitors like you mentioned may help. You can also upload a image to the card while outside the synth using USB power supply. If you still encounter difficulty please contact me via email.
Leaving this comment mainly so that people who visit the page know that this is an excellent idea and execution, uncomplicated to carry out, and that the communication and shipping (extremely fast) were top-tier. Thank you very much!
Thank you for your purchase and comment!
Hello,
If you buy two cards, will shipping be $6 x2 ?
Cheers.
Hi:
You will be charged that amount initially, and any extra will be refunded to you after I get the invoice from shipping company.
hi there. really want to buy one or two, waiting for restock. excellent workit seems!
1. do you ship to Russia?
2. will it be possible to pay with card (no paypal here)
thanks.
Hi: I can ship to Russia. You can pay via KoronaPay by making a transfer to one of my UnionPay card. Please contact via email for details.
I just bought 2 cards from your last batch.
I put one in my XV-88 slot A, with Wi-Fi on and it works no problem.
Thank you for your comment.
Hi!
Can u please tell me how I can get on the notification list?
Martin
Hi:
Please see “Buy Now” section. there’s a link to the notification subscription page. Or you can use this link: https://www.ddzheng.cc/?page_id=760
Hello bro, price? I have by one.
Hi:
You can see the price at checkout.
Received at Spain in only 10 days. Works really fine on my JV1010. Need to turn off wifi, as with wifi turned on, the 1010 was rebooting constantly… once turned off the card works flawlessly!
Hi:
Thank you for your comments. For the JV-1010 there should be no issue using with Wi-Fi on, as I have a JV-1010 as well. You may want to replace your external power supply or check your 1010’s internal regulator and/or capacitors.
Hi there! Any plans making cards for JD-800? Also, do I get it right: I have to make “backups” myself from the original cards and no original rom files are included?
Hello from Spain! I’m planning to buy one. I’m already subscribed. I really like it. Great job!
Gosh, I found out this bit too late, there’s no one available 🙁
Please, let me know when will be and I’ll def. gonna buy it!
Cheers
Hi:
There’s been more than enough demand and a new batch has started. Please join the stock availability notification service so that you can receive an email when it’s back in stock.
Awesome, thank you! I purchase one already and just started using it in my JV-2080, very happy with it. Do you have an opinion on how many cards you would recomend if all cards are on WIFI OFF mode? Or would you consider that unsafe? I’d like to buy more cards when batch 6 is ready.
Hi:
I think you can pop in all 8 with it if you use Wireless Off Mode.
Hi,
big fan of you JV Wifi card. 🙂 Kudos!
As a Yamaha TG33 owner – is there any chance that your memory card will become compatible with this synth?
Thank you,
kind regards,
Don
Hi:
Thank you. There is currently no plan to make such card.
I’m using the card without any issues in a JV-1000. Even with wifi enabled it works perfect. I don’t think the power supply will have too much stress with that card because the JV-1000 has only one slot available instead of 8 slots in a JV-2080 which i use only with Romulator cards.
Thank you for your comment.
I’m really considering buying this, but the don’t see the XV-5050 on the supported devices list. I also noticed that some synths don’t work in specific card slots. As the XV-5050 only has two slots I’m wondering if it’s the two slots that have issues (maybe power? ).
Anyone else have experience with the 5050?
The XV-5050 only have SRX slots and is not compatible with this card.
Hi, I’m interested in purchasing the card. I’m in Spain cp 08205. How much is shipping to Spain? When I click “buy,” the product only shows up in PayPal. When is the shipping charge? Thanks
Hi:
The shipping cost is included in the product price. If you purchase more than 1, then extra shipping cost (if any) will be refunded to you once package is shipped out by the express company.
你好, 請問可以發或至台灣地區嗎? 謝謝
你好,可以发货至台湾的。
arrived after 14 days, works like a charm. thank you a lot, it’s fantastic!
Thank you for your comment.
Any idea when shipping to United States if we will get hit with the Tarrif?
Hi:
I did not receive related complaints recently.
card received
can’t get it to work via wifi
when i try via usb it does not show up on my dektop
I’ve contacted you via email.
Hello Connor, just had time today to test the board on my JV1010 and it worked as expected, so I’m very happy with that ;). Congrats again on this project, which allows to keep the legacy Roland equipment always great!
Recibido en España super rapido en 15 dias ya lo tenia en casa, funciona a las mil maravillas, este proyecto es un sueño para cuaquier usuario de antiguos equipos de roland, espero que se anime a hacer lo mismo con las tarjetas SRX
Received in Spain super fast in 15 days and had it at home, works like a charm, this project is a dream for cuaquier user of old roland equipment, I hope you are encouraged to do the same with the SRX cards.
Gracias por tu comentario.
中国北京可以发货吗?XV2020可以使用吗?
你好,可以发,请从闲鱼购买。XV2020没有SR-JV80插槽,不能用
Thank you
Hi Connor,
I just received my board (it took 10 days to arrive in France), and I have to say it’s a fantastic piece of gear. Very easy and fast (about 6 minutes) to program. Thank you!
However, I am facing an issue. In my JV-1080, I had 4 Romulator cards and replaced the one in expansion slot A with the SRJV80-Wifi. On certain patches (from the SRJV80 wifi only), I experience strange glitches when playing chords while having more than 2 boards installed. With the SRJV80-Wifi and 1 Romulator, everything works perfectly. But when the SRJV80-Wifi is paired with 2 or 3 Romulators, the glitches occur.
I made a short video showing the problem: https://youtu.be/5xgHy-XhDpY
I suspect this might be a power supply issue, as my JV-1080 is over 30 years old and may need the power supply to be recapped. (and I know that the SRJV80 wifi consumes more power than a Roland or Romulator card)
I’m wondering: Is it possible to power the SRJV80-Wifi through the USB connector while using it, to test if the power is indeed the source of the problem? Or would doing so pose a risk to my JV-1080 or my SRJV80 Wifi board ?
Thanks for your help
You should disable WiFi after you upload the ROM to the cards, to put them in a low power state. You have a choice of Bluetooth wakeup, which uses a bit more power, or complete shutdown of both WiFi and BT, this way you can only wake WiFi by pressing a button that’s on the card itself.
I did not mention it in my original message, but I already put the board in ‘airplane’ mode (no Wi-Fi, no Bluetooth) to save as much power as possible. I soldered an external button to re-enable Wi-Fi.
Hi:
I’ll contact you via email.
Matériel bien reçu
J ai installé la carte sur un Roland jv880 tout fonctionne bien.
Transfert wifi ok
Je ne regrette pas mon achat
Philippe
Thank you for your comment.
I highly recommend this. Received mine very quickly (Australia) with great communication from the seller (thanks Connor). I followed the simple setup instructions above, installed it in my JV-1010 and PERFECT!! Great bit of kit.
Thank you for your comment.
Hello, how are you?
I made the purchase but forgot to include the address of a friend in Portugal. I have already sent an email requesting a change of address.
Thank you!!
Olá Tudo Bem!
Eu fiz a compra mas me esqueci de colocar no endereço de um amigo em Portugal. Já mandei email solicitando a troca do endereço
Obrigado!!
Thank you for your comment.
Hello. I would like to purchase your board for testing. If the testing is successful, I would like to purchase it permanently. Waiting for your reply. Thank you.
Please contact me via email. Thank you.
Very interesting. I would like to order, but can you ship to Serbia(Europe) ? If you can not now, in the near future maybe ?
Please purchase as normal. We can ship to Serbia.
Very nice! Looking forward to test it!
Thank you for your comment.
I’m also interested in purchasing this unit for my JV880.
Let me know when you have more in stock.